Low-Cost Injection Molding Using 3D Printing
It’s no secret that 3D printing is a great tool for affordable production of custom objects. With new 3D technology like the Formlabs Fuse 1, there are a variety of options availible for small batch production needs that help manufacturers save on cost-per part. However, in some cases injection molding is still ideal for scaling production needs.
In this post, you’ll learn how to combine 3D printing and injection molding for small batch production. By using 3D printing to cost-effectively produce your molds and injection molding to rapidly produce identical copies, you leverage the benefits of both technologies. In this tutorial, we’ll go through the process of designing your mold, choosing a material, and producing injection molded parts. By the end, you’ll have the knowledge to access the speed and cost-efficiency of injection molding processes.

Material Options
Many popular FDM materials began as injection molding plastics and share similar thermal properties. Most injection molding thermoplastics fall in the melting temperature range of 200C-300C. Unfortunately, this means that molds cannot be produced on FDM machines. Even high temperature FDM materials like Ultem and Polycarbonate will deform when exposed to the temperatures required for injection molding.
Historically, molds have been produced via CNC processes where metals like aluminum are subtractively manufactured to produce the final mold. This is still the most popular technique because of the long-term durability of aluminum, but lower-cost options are enabled by new 3D printing materials.
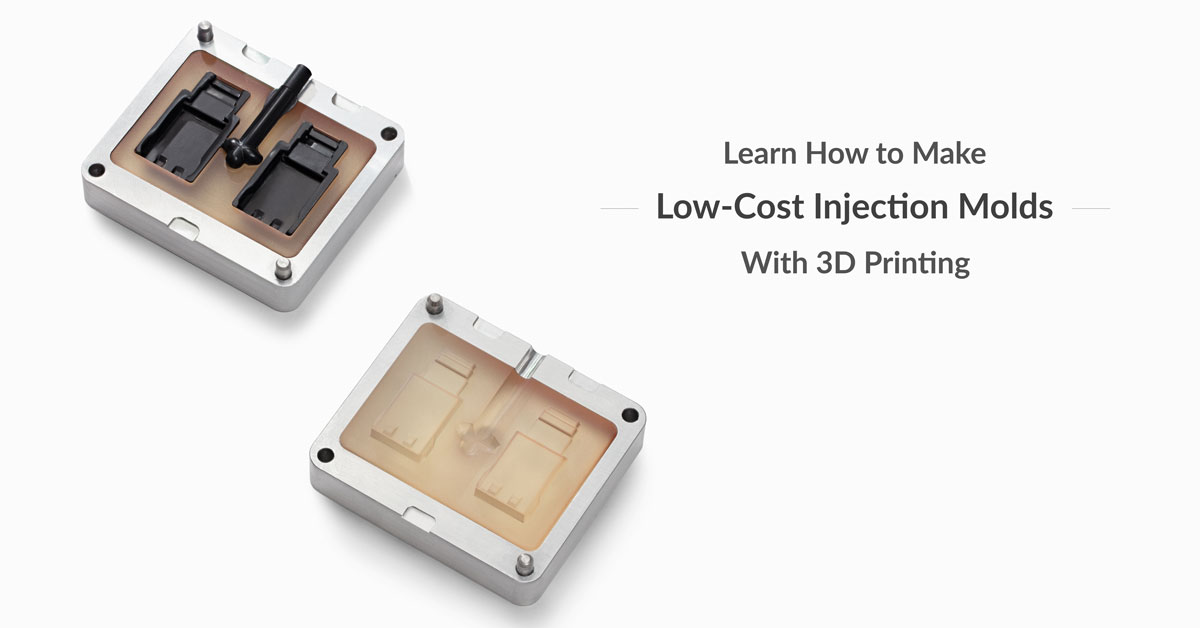
One of the most popular material for producing mold cores with 3D printing is High Temperature Resin by Formlabs. With a Heat Deflection Temperature (HDT) of 289C @ 0.45MPa, High Temperature Resin can comfortably meet the thermal requirements of many thermoplastics. This material is on par with other SLA resins in terms of cost and is orders of magnitude cheaper than traditional CNC manufacturing. 3D printing with High Temperature Resin allows you to design molds that would otherwise be impossible using subtractive manufacturing techniques.

Creating your Mold
There are many nuances to injection molding design. If you are interested in learning more, we recommend you do some external research since it is outside the scope of this blog. For large production items, industrial processes are still necessary but this bench top technique will successfully produce copies of small parts.
To start, grab a copy of Blender for free and download the blank mold core design files. These were fitted to our specific injection molder but can be scaled to accommodate your machine. Next, download or export an .STL for the 3D model that you’re looking to copy.
Import: We’ll be making use of the boolean difference function in Blender which subtracts the area of two intersecting objects. To start, import both mold halves of the mold core and an STL of the object you’ll be making into Blender. Setup your workspace by using the eye icon in the scene explorer to toggle off one half of the mold. Next, set both halves of the mold to the ‘wire’ draw type under the Object menu.

Position Your Mold: Now you’re ready to position your object. The main thing you’ll want to ensure is that the object fully intersects with the inlet for the molten plastic. Switching to your top view and then entering orthographic mode via ‘toggle perspective/ortho’ is a great way to go about this. Then switch to the front view and ensure that the object is lined up on your front plane.
Turn the visibility of your current mold core off and turn the other side on. Now repeat the process to ensure that the object fully intersects with the inlet of the other half of the mold core. With your object lined up, you’re ready to boolean!

Boolean: Select the first half of your object and choose the boolean option under the Modifiers Menu. Select the object you’re cutting and make sure that the ‘difference’ operation is selected. Apply the operator and do the same for the other side. It should look something like the image below.
Tip: If you’re getting stuck here, check out the tutorial on adding interlocking components to any design. This goes through the same boolean steps with a bit more visualization.

Export: Now export each half of your mold, making sure to check the ‘selection only’ box in the blender exporter.
If you don’t want to create your own injection molds using a 3D printer and high temperature resin, printing services like Shapeways have compatible options as well.
Injection Molding
Now we’re onto the exciting bit, actually molding your object. There are a number of benchtop injection molders on the market which vary in cost. Many of the lower cost molders use a hand driven plunger and some of the more expensive units use a screw or pneumatic system. Ours is on the older and lower-cost end which means that we were restricted as far as material usage and part volume goes.

High Temperature Resin has an HDT of 289C @ 0.45MPa and it is safe to go up to at least this temperature so long as you aren’t exerting excessive pressure on the mold. You have a number of material options to choose from which come as pellets. We used LDPE (Low-Density Polyethylene) because of its low melting temperature and high flow rate. Other options you might look into include: ABS, PETG, Polypropylene, HIPS (High Impact Polystyrene). The material you choose here will depend on the desired properties of your object and capabilities of your injection molder.
From here, follow the specific instructions for your machine to produce your parts! There are a few tricks to make the process smoother and faster.
- A water bath can be used to more rapidly cool your part
- Mold releases make part removal easier and are a necessity for many materials
- Aluminum cores can be used to encapsulate your mold and improve resistance to cracking from pressure (example included in Formlabs’ White Paper)

3D printing eliminates one of the largest costs for injecting molding small objects by manufacturing of the mold itself. The primary cost barrier now is access to effective, low-cost machines. Thankfully, new products continue to hit the market. For further information and an overview of this process from Formlabs themselves, check out their White Paper.
![]()


